
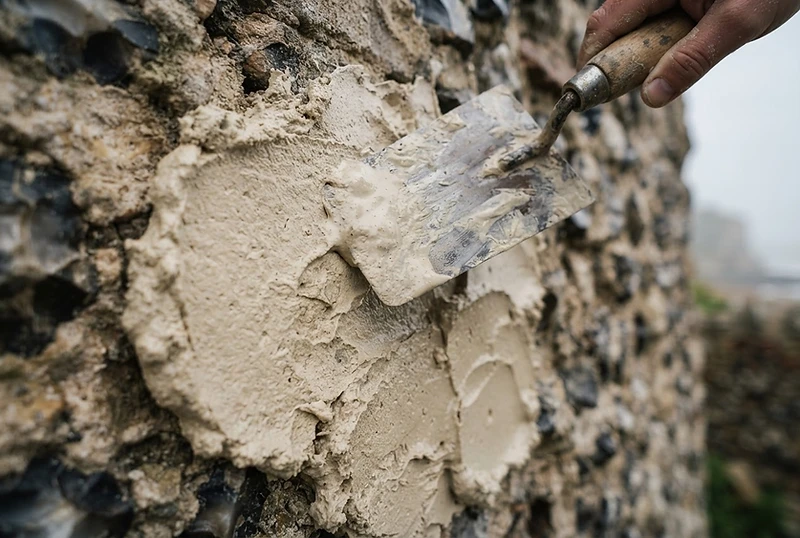
Lime Render, Lime Plaster & Regency Stucco Specialists in Brighton & Hove
Lime rendering, lime plastering and traditional solid-wall finishes reinstated using materials compatible with the original construction of your building.
Where incompatible modern finishes — such as cement render or dense gypsum plaster — are contributing to a problem, we assess whether their removal is technically justified before recommending reinstatement with lime-based or otherwise compatible systems.
Lime is not a fashion. It is a material that behaves in a way suited to the solid, breathable walls found across Brighton and Hove. We use it where the construction calls for it, and not as a blanket specification.
Why Lime for Older Buildings
Traditional solid walls in Brighton and Hove were designed around lime mortar, lime render and lime plaster. These materials allow the wall to release moisture through evaporation rather than trapping it within the structure.
Hard cement-based finishes are significantly less permeable. When applied to a traditional wall, they can slow this moisture movement and, in some circumstances, contribute to damp problems and deterioration of the softer masonry beneath.
Lime finishes are not automatically correct for every wall. But where the construction is traditional and the existing finishes are causing or contributing to a problem, a compatible lime system is often the appropriate response.
Lime finishes can be suitable for walls constructed from:
- Bungaroosh
- Flint
- Soft historic brick
- Lime-mortared solid masonry
- Chalk
- Mixed traditional materials
The specification follows the wall beneath it.
Lime Rendering
Lime render provides a compatible external finish for traditional solid walls while allowing moisture within the wall to disperse through evaporation.
Safe-Bricks undertakes lime rendering as part of wider wall repair and reinstatement work, not as a standalone decorative overlay.
Our lime rendering work can include:
- Removal of failed or incompatible render
- Preparation of the exposed masonry
- Local masonry or bungaroosh repairs
- Application of base coats
- Building the render in suitable coats
- Applying a compatible finishing coat
- Appropriate curing and protection
- Compatible decorative finishes where required
The exact build-up is selected to suit the individual wall rather than applied to a standard schedule.
Regency Stucco & Façade Restoration
Much of Brighton and Hove's Regency and early Victorian stock is faced in stucco: a lime-based external render, often ruled to imitate ashlar stonework and enriched with cornices, platbands and moulded detail.
Stucco façade repair is a specialised application of the same principle that governs the rest of our lime work. The material must remain vapour-permeable so that moisture reaching the wall can evaporate through the face rather than accumulating behind it.
Our stucco work is specified according to the original fabric and can involve:
- Assessing the moisture source before any repair is specified
- Identifying areas of hollow, detached or blown stucco
- Natural hydraulic lime or prompt cement mixes selected to suit the original
- Reinstating ruled ashlar lining to match the surviving pattern
- Repairing or running cornices and architectural mouldings
- Removing cement patching where it is causing loss
- Compatible vapour-permeable decoration
Modern masonry paints and cement patch repairs are a common cause of stucco failure. Where they seal the face of a wall that still needs to dry, moisture concentrates behind the render and the stucco blows away from its background.
For that reason we establish why the stucco has failed before specifying its repair. Where the façade is listed or sits within a conservation area, the consent position is established before work begins, as changes to external finishes, colour and texture can require Listed Building Consent.
Repairing Blown or De-Bonded Stucco
Blown or de-bonded stucco is stucco that has lost its adhesion to the background behind it. It sounds hollow when tapped, and it may show as bulging, star-cracking or sections that have already fallen away. Over a bungaroosh background the problem deserves particular care: the material behind a Regency façade is variable in composition and strength, and the stucco face is often the weatherproofing.
The repair follows a defined sequence so that the wall is left able to dry rather than sealed around a patch:
- 1The elevation is sounded and mapped before anything is cut out, so the full extent of detachment is known rather than chased as it appears
- 2Failed stucco is cut back to a firm margin and the edges feathered onto sound material, so the reinstatement keys into the wall rather than bridging a hollow
- 3The exposed bungaroosh is assessed and any soft or friable areas consolidated before reinstatement begins
- 4The opened-up background is allowed to dry, so that moisture is not closed in behind the new work
- 5Reinstatement is built in successive coats keyed to the background, each compatible with the original and thin enough to carbonate properly
- 6Ruled lines, cornices and mouldings are re-run to match the surviving pattern, and the finished face is decorated only in a vapour-permeable coating
The principle throughout is to reinstate only what has failed, in materials that allow the wall to keep drying. A repair that seals a hollow behind it does not stabilise a façade — it moves the problem to the edge of the patch, where trapped moisture blows the next section in turn.
Our render repair and redecoration in Hove at 58 & 60 Brunswick Street West shows this sequence carried out across two adjoining rendered townhouses: sounding and cut-back at high level, consolidation of the failed areas, and a breathable finish reinstated across both façades.
The Right Mix for Patching Regency Stucco
There is no single correct mix for patching Regency stucco, because the correct mix is the one that matches the original. Much of Brighton's original stucco was bound with fat lime or, later in the period, natural Roman cements and hydraulic limes — binders that set partly by reaction with water as well as by carbonating in air. A patch specification therefore begins with an examination of what is already on the building, not with a product chosen from a catalogue.
In practice the field usually narrows to two families of binder:
- Natural Roman cements — including prompt natural cement — which set comparatively quickly, gain early strength and suit fine façade work and moulded detail
- Natural hydraulic limes, typically NHL 2 or NHL 3.5, which remain vapour-permeable and suit body coats and larger areas of reinstatement
What does not belong in a lime-faced Regency façade is a Portland cement or acrylic-modified patch. These are denser and far less permeable than the stucco around them: they hold moisture within themselves and concentrate drying at their edges, which is why cement patches so often fail again within a few years — taking more of the original face with them.
Colour and texture are matched on samples before the work reaches the façade, because a weathered original rarely matches a fresh mix straight from the mixer.
Lime Plastering
Internal lime plaster reinstatement is often appropriate where existing dense or damaged finishes have been contributing to moisture problems in a traditional wall.
As with render, removal is only specified where the condition of the wall justifies it. Where existing plaster is sound and compatible, unnecessary stripping is avoided.
Our lime plastering work can include:
- Removing defective or unsuitable internal finishes
- Preparing the exposed masonry background
- Repairing loose or defective backgrounds
- Applying base or backing coats
- Building the plaster in suitable coats
- Applying a compatible finish coat
- Allowing appropriate curing and drying
- Preparing for compatible decoration
A lime plaster system takes time to dry properly. The decorative finish should not be selected independently of that drying period.
When Lime Finishes May Be Appropriate
Lime is not the answer to every problem in an older building.
We consider lime where a property contains:
- Traditional solid masonry built with lime mortar
- Existing historic lime render or plaster
- Bungaroosh, flint or soft brick
- Walls affected by inappropriate modern finishes
- Recurring damp associated with trapped moisture
The presence of an older building does not automatically mean every wall must be finished in lime. Each area should be assessed individually, and the existing finishes considered before any removal is recommended.
We do not assume that all modern plaster or render is harmful, nor that every damp problem is caused by cement.
Removing Incompatible Finishes
Where existing cement render or dense gypsum plaster is contributing to a problem, removal may be justified.
Removal must be carried out carefully. On soft traditional masonry and bungaroosh, aggressive mechanical removal can damage the wall beneath — which is sometimes weaker than the finish being removed.
We consider removal where the existing finish is:
- Extensively detached or hollow
- Cracking or failing across large areas
- Incompatible with the underlying wall
- Concealing significant masonry defects
- Materially contributing to a moisture problem
Where the existing finish is sound and compatible, it is retained rather than stripped unnecessarily.
Traditional Multi-Coat Systems
Lime render and plaster are typically built up in successive coats rather than applied as a single layer.
A typical build-up may include:
- 1Preparation and repair of the masonry background
- 2Base or backing coat
- 3Intermediate coat where required
- 4Fine finishing coat
- 5Appropriate curing and protection between stages
- 6Controlled drying before decoration
The precise number, thickness and composition of coats varies according to the substrate and the selected system. We do not treat one standard build-up as universally correct.
Curing Lime in a Coastal Climate
A lime render does not set by drying. It gains its strength by carbonation, a gradual reaction in which the lime takes carbon dioxide back out of the air and reverts to a stable form. That reaction needs moisture present within the coat to proceed, but not saturation, and it works inwards from the face over an extended period. Everything about how lime is applied and protected follows from that.
A coastal elevation in Brighton and Hove interferes with the process from both directions at once. Moving air and sun draw water out of a fresh coat faster than it can be replaced from within, so the surface stiffens before carbonation has taken hold — which shows as dusting, crazing and shrinkage cracking, and as a coat that never reaches the strength it should. Wind-driven rain and spray do the reverse, wetting a green coat unevenly, washing binder off the face and leaving it too saturated for carbonation to continue.
Salt-laden air adds a further factor. Salt deposited on or within a curing coat holds moisture, so the coat stays damp for longer in humid conditions and dries sharply when the wind changes, and salts crystallising near the surface disturb the coat while it is still gaining strength. This is why exposure, not just wall area, governs how a coastal elevation is specified and protected.
Curing on an exposed elevation is therefore managed rather than left to the weather:
- 1The background is dampened before application so it does not draw water out of the coat
- 2Each coat is protected from sun, drying wind and driving rain, and screened where the elevation is exposed
- 3Coats are misted as required so they firm slowly rather than drying out
- 4Several days are allowed between coats, extended in cold or persistently wet conditions
- 5Coats are kept thin, because a thick coat carbonates slowly and cracks as it shrinks
- 6Work is not applied in frost, in the expectation of frost, or in direct summer heat on a south or west elevation
- 7Decoration is withheld until the render is ready to receive it, rather than to a pre-agreed date
On an exposed Brighton or Hove elevation, the staged programme of application, protection and controlled drying can run to around four weeks before the render is ready for limewash or mineral decoration. That is the point at which the surface can be decorated — not the point at which the render has finished carbonating, which continues through the section for a considerable time afterwards, and is one reason a vapour-permeable coating matters.
This is also why lime work has a season. A programme that would be straightforward in late spring may be unworkable in midwinter, and we would rather say so at the outset than compress the curing stages to meet a date.
What Governs the Cost of Lime Rendering
Lime rendering on a heritage property is not priced from the area of the wall, because the wall area is one of the smaller variables. What governs the cost is the condition of what lies behind the finish, the exposure of the elevation, and how the work has to be reached and programmed.
We set the factors out openly so that a scope can be read and understood, and so that differences between one elevation and another make sense. Two elevations of the same size on the same house can differ considerably.
The factors that carry the most weight are:
- 1Substrate condition — how much failed cement or incompatible render has to be removed, and whether it can only be taken off by hand because the wall behind it is softer than the coating over it
- 2Repair before finishing — the extent of consolidation, void filling, repointing and local masonry or bungaroosh repair needed before any coat can be applied
- 3Coat build-up — the number and thickness of coats the exposure and background call for, since an exposed elevation is not specified as a sheltered one
- 4Access — scaffolding to the elevation, and whether it is complicated by a highway, a basement lightwell, a shared frontage, a rear garden with no side access or a seafront position requiring additional bracing and sheeting
- 5Enrichment — mouldings, cornices, platbands and ruled ashlar lining, which are run and matched by hand rather than applied as a flat finish
- 6Curing and programme — the protection required and the waiting time between coats, which extends the period on site without adding rendered area, and which lengthens in cold or wet weather
- 7Consent and matching — where Listed Building Consent or conservation controls apply, the analysis and matching of the existing material, and the sampling that supports the application
- 8Salt loading — where testing shows significant contamination, the poulticing cycles needed before a finish can be reinstated
- 9Decoration — the compatible vapour-permeable finish specified over the render, and the number of applications it requires
Because those factors are established by inspection rather than assumption, we do not publish a rate per square metre and we do not price lime rendering from photographs alone. Photographs are useful for an initial view of the likely construction and condition.
The scope is written after the wall has been inspected, the cost follows the scope, and where a factor above is uncertain at the point of pricing we say which one it is rather than absorbing it into a figure.
Salt-Draw Poulticing on Seafront Elevations
On seafront and near-seafront walls, salt contamination is often the reason a previous lime repair failed early. Reinstating a finish over a salt-loaded wall puts a new coat onto a background that will keep it damp and push salts through it. Where testing shows significant loading, we reduce it before the finish is reinstated.
- Where the salt comes from
- On an exposed elevation, airborne salt arrives in wind-driven rain and spray and is carried into the outer part of the wall. Salt from de-icing, from historic ground contamination, or drawn up from wet ground below can add to it. The salt itself does not evaporate. As the wall dries, the water leaves and the salt stays behind, concentrating in the zone where evaporation occurs.
- Why it damages fabric and finish
- Soluble salts take up and release moisture as humidity changes, and crystallise as they dry. Crystallisation within the pores of a soft historic brick, chalk or lime matrix exerts pressure against the material from inside, which is why salt-loaded masonry loses its face in flakes and powder. The same salts break the bond of a new coat, keep it damp, and reappear through decoration as a bloom.
- What a poultice does
- A poultice is a sacrificial absorbent layer applied to the wall face and kept damp so that it, rather than the wall, becomes the point at which drying happens. Water moves from the wall into the poultice carrying dissolved salts with it, and as the poultice dries the salts crystallise within it. Removing the poultice removes that salt load from the building.
- How it is carried out
- The wall is dampened so salts are in solution and able to move, the poultice is applied and covered to control the rate of drying, then left to dry and removed. It is normally repeated: one application reduces the loading rather than eliminating it. Progress is judged by testing the wall between applications, not by appearance alone, and the number of cycles is determined by what the testing shows.
- What it will not do
- Poulticing removes salt already in the wall. It does not stop water arriving. Where a failed gutter, a bridged damp line, defective pointing or rising ground moisture is still supplying salt-bearing water, the salt returns and the work is wasted. For that reason we deal with the wetting mechanism first, poultice second, and only then reinstate the lime finish.
Poulticing is a slow, measured process rather than a treatment applied in a single visit, and it is specified only where the evidence justifies it. On a lightly affected wall it is unnecessary.
Compatibility and Decoration
A lime finish is only as good as the decoration applied over it. A modern, low-permeability coating can undo the vapour-permeable benefit of a lime system.
Where lime render or plaster has been reinstated, the decorative finish should also be selected with compatibility and drying potential in mind.
Suitable decorative finishes can include:
- Mineral or silicate paints
- Lime washes where appropriate
- Vapour-permeable coatings
- Breathable traditional finishes
The coating is chosen according to the substrate, exposure and the system beneath it.
Exposure matters a great deal on the seafront, where wind-driven rain and airborne salt increase the volume of moisture the finish has to release. Our coastal stucco maintenance guide sets out how those conditions affect coating selection and routine inspection.
Lime Finishes and Damp
Lime finishes are sometimes presented as a cure for damp. In reality, they allow a traditional wall to behave as it was designed to — but they do not fix an active moisture source.
Before reinstating lime finishes, we investigate whether there is an underlying defect — leaking rainwater goods, high ground levels, plumbing leaks, condensation — that is supplying the moisture in the first place.
Reinstating lime on a wall that is being wetted by a failed gutter will not resolve the problem. The defect must be repaired first.
Conservation Areas and Listed Buildings
Many Brighton and Hove properties that would benefit from lime finishes are listed or sit within conservation areas.
External render changes — including material, colour and texture — may require Listed Building Consent or fall under conservation controls. We can advise on the likely requirements and specify work that respects the building's historic character.
Consent for Patching or Repainting Stucco
Whether consent is needed depends on what the work changes. Patching stucco on a like-for-like basis — the same material, the same colour, the same ruled finish — is generally treated as maintenance rather than alteration, and often proceeds without Listed Building Consent. Repainting is less straightforward: repainting a previously painted stucco façade in the same colour is usually routine, but a change of colour or coating type on a listed building can require consent, and within a conservation area the position is established with the council rather than assumed.
The distinction that matters is between repair and alteration. A patch that reinstates what was there is repair; a change of finish, colour or texture is an alteration, and alterations to a listed building are consentable works. Because the line is drawn case by case, the consent position is established before work is instructed rather than assumed from general guidance.
We do not advise on the law, but we specify work so that it can be described clearly in a consent application, and we flag early where a proposed change of finish is likely to require one.
Completed lime and stucco work in Brighton and Hove
Written case studies setting out what was removed, why, and how each wall was reinstated in a finish it can tolerate.
58 & 60 Brunswick Street West, Hove
Failed render panels removed from two Victorian townhouse elevations, the masonry prepared and made good, and the facades reinstated in lime and decorated in a permeable system.
Read the case study →28 Brunswick Terrace, Brighton
Listed Regency seafront elevation where hard finishes had held moisture in the bungaroosh behind. Rebuilt and refinished in lime specified for full coastal exposure.
Read the case study →15 College Terrace, Brighton
Internal cement and gypsum finishes stripped from solid walls, the backgrounds repaired, and the rooms replastered throughout in lime with permeable decoration.
Read the case study →Areas We Cover
We reinstate lime render, lime plaster and Regency stucco throughout Brighton, Hove and the East Sussex coast, including exposed seafront elevations where the specification has to allow for wind-driven rain and airborne salt.
- Brighton
- Hove
- Portslade
- Southwick
- Shoreham-by-Sea
- Lewes
- Newhaven
- Seaford
- Eastbourne
- Peacehaven
- Saltdean
- Rottingdean
Why Safe-Bricks for Lime Finishes
Safe-Bricks reinstates lime finishes as part of a properly considered repair, not as a standalone decorative change.
We diagnose the actual problem before specifying removal or reinstatement, use materials compatible with the original construction, and allow appropriate drying before decoration.
We will not recommend stripping a wall or applying lime where the existing finish is sound and the construction does not require it.
Planning a Lime Finishes Project?
If you have a traditional wall with failing render or plaster, or you have been advised that lime finishes may be appropriate, send Safe-Bricks photographs for an initial review.
Useful photographs include:
- The complete wall externally and internally where relevant
- Close-ups of cracked, hollow or damaged finishes
- Areas of damp staining
- Exposed masonry where visible
- Gutters, downpipes and ground levels adjacent to the wall
- Any previous repairs that may be failing
Photographs can help us understand the likely construction and condition, though significant defects may require an inspection before a specification is confirmed.
Lime rendering in Brighton: cost, curing and consent
Not sure where to start?
Send us photographs of the area of concern. It is the most straightforward first step — we will look at what you can see and advise on the appropriate next steps.